Windows Subsystem for Linux (WSL) 2 is no longer just for insiders, you can install WSL2 today with Windows 10,
Version 2004, Build 19041 or higher. The Windows Subsystem for Linux lets developers run a Linux environment on Windows like command-line tools, utilities, and applications directly on Windows, unmodified, without the overhead of a traditional virtual machine or dual boot setup.
WSL 2 provides improvements to file system sharing, boot time and allows access to some cool new features for Docker Desktop users. With Docker Desktop running on WSL 2, users can leverage Linux workspaces and avoid having to maintain both Linux and Windows build scripts. In short, now we can have a Linux development environment on Windows.
Step 1: Update Windows 10 to version 2004 or higher
To use WSL2, Windows 10 has to be
updated to version 2004 (Build 10941) or higher. Once installed or updated check your Windows version by opening the “Run” dialog (Windows key + R) and enter
winver.Step 2: Turn Windows features on
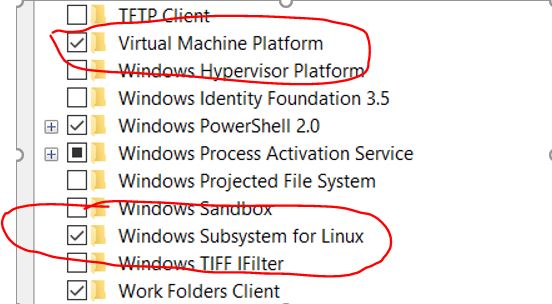
Once the system restarted from step 1, navigate to the control panel -- Turn Windows features on or off. Then Enable both ‘Virtual Machine Platform’ and ‘Windows Subsystem for Linux’. Restart your computer.
After the restart of the system if Docker is already installed on windows it pops up with below window to "Enable WSL 2"
As part of
Enable WSL 2, you need to install WSL 2 Linux kernel from
here. Now if we go Docker, Settings - General ‘Use the WSL 2 base engine’ will be selected.
Step 3: Installing a Linux distribution
Once the system restarted from step 2, navigate to the Microsoft Store and install Linux distribution. I am going with Ubuntu.
Once the Linux distribution has been installed, You will be asked to create a username and password when you launch Linux for the first time, these need not be your windows system you can choose new username and password.
you can exit from the above window by typing exit and clicking enter.
Step 4: WSL1 to WSL2
Open Command prompt or Windows Powershell and check the version of WSL by using the command wsl -l -v. If the version is 2 all good to go else we need to set version to 2 as shown below
If you want to make WSL 2 your default architecture you can do so with below command
wsl --set-default-version 2
What apps I can run in WSL2?
With WSL2 you can run things like Docker, Kubernetes, etc. WSL2 works with
Visual Studio Code as well. Now you can run .NET core console and web apps in WSL2 and debug directly from
Visual Studio 2019


Comments
Post a Comment