GitHub Copilot Customization Explained for Beginners: Instructions, Prompt Files, Skills, Agents, and Hooks Introduction If you've recently started using GitHub Copilot, you've probably come across terms like Instructions , Prompt Files , Skills , Agents , and Hooks . At first glance, they all seem to do the same thing—they tell Copilot what to do. So why does GitHub have five different customization features? The answer is simple: each feature solves a different problem. Think of GitHub Copilot as a new developer joining your team. On their first day, you don't just hand them code. You explain your coding standards, give them reusable templates, teach them specialized knowledge, assign them a role, and automate repetitive tasks. That's exactly how GitHub Copilot customization works. In this article, you'll learn what each feature does, when to use it, and how they all work together. By the end, you'll know which feature to start with and which ones can wait un...
Building a CI pipeline for Containerized Asp.NET Core 3.1 using Docker Registry
This is continuation of a series of posts on using Docker and containerization with .Net Core. If you are new to this series its recommend to look at Getting started with Docker and Containers
In this post will show how to setup a pipeline that continuously builds
a repository that contains a Docker file. Every time you change your code, the
image is pushed to Docker Hub.
Pre requisites
1.
Github account
3.
Ensure you’re administrator of the Azure DevOps
project
5.
Azure Project to be created in Azure DevOps
Get the code from GitHub
https://tinyurl.com/ydtggef6
Create the Pipeline
1.
Sign in to your Azure DevOps Organisation and
navigate to your project
2.
Go to Pipelines and click on New Pipeline

3.
Select where is your code from the below screen. In
our example its on GitHub. If you’re proficient with YAML choose GitHub YAML
where your pipeline can be scripted and for new people to start we will be
using classic editor which provides GUI interface.


4.
After clicking on Continue it asks for Built
template lets start with empty job
template
5.
Navigate to Trigger tab and enable “Continuous Integration”
for the respective branch which enables CI on it.

6.
Adding Docker task in pipeline
Note: Docker Task version used
here is 2.*
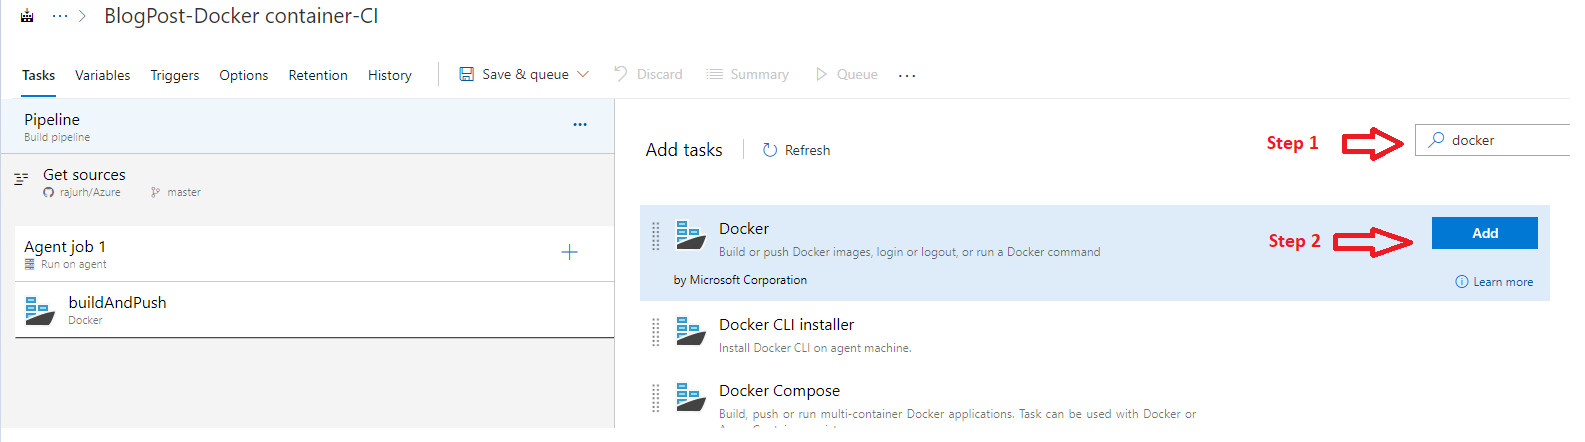
7.
Configure Pipeline task for Container Repository


Save the pipeline all set to go at this point. Now if we trigger a build or code is pushed to repository,
In Docker Hub repository we should be able to see the latest image pushed from
Azure DevOps.
Popular posts from this blog
Tidy up - Unused Project and Nuget package reference using Visual Studio 2019

If you are a Developer/Architect using Visual Studio as IDE for your development activities, this blog post will be of your interest. During the Ignite 2021 conference, Microsoft released Visual Studio 2019 v16.9 and v16.10 Preview 1. As part of version 16.10 Preview 1, one of the cool features they introduced is to "Remove Unused References..." for any Projects and Nuget packages that are not in use. At the time of writing this blog post, we have Visual Studio Version 16.10.0 (official release) which includes this new feature. As part of development, we generally get carried away and introduce new Nuget package references to your project and add new references to your Projects. By the end of development, you will not be 100% sure which are not being referenced and unused which means you will leave those unused project references in your application. Now you might be wondering what's the big deal in it since it doesn't harm. The advantage of removing unused project r...
Automate Certificate Issue and Renewal process - k8s cluster

In this blog post, we will see if you have an existing or new Kubernetes cluster with Ingress resources how do we auto-renew the certificates. If it's not auto-renewed things need to be manually done e.g. every three months you have to renew certificates, delete the expired certificate and secret, update with new certificate secrets accordingly. Manual is always tedious and not an ideal solution especially for your Test & Production environment. Pre-requisites Install and setup kubectl Install and setup Helm Kubernetes cluster already provisioned with Ingress resources. Note: The scope of the blog post is to show how the certificate renewal process can be automated, the same logic can be moved to your Deployment pipelines. Install Cert Manager Installing Cert-Manager CRDs using the below command. #For Kubernetes 1.15+ kubectl apply --validate = false \ -f https://github.com/jetstack/cert-manager/releases/downloa...
Authenticate Azure Functions - API Keys

In this blog post, we will see one of the ways to secure your Azure Functions using API keys. Security plays a key role as part of SDLC (Software Development Life Cycle) doesn't matter whether it's exposed to the client/public or even if it's internal. There are multiple ways to secure your Azure Functions like API Keys, Certificate, API Mgmt, App Service Authentication, etc. If you are new to the Cloud and Azure Functions but want to make a start with minimal effort and less setup of Infrastructure, then API Keys is the ideal choice. Azure Functions allows you to secure HTTP-triggered functions by API access key in the request. As part of creating new Azure Functions, we can select the Authorization Level enum value. If we set the Authorisation level to Anonymous, no security applied which means no authentication applied for the endpoint. Authorization Level - Function By setting the Authorisation level to Function each Azure Functions require a specific API key to Au...
Comments
Post a Comment